Html : Images
There are several things to consider when selecting and preparing images for your site, but taking time to get them right will make it look more attractive and professional.
Images features:
- should be relevant.
- should convey information.
- should convey the right mood.
- should be instantly recognisable.
- should fit the color palette.
Adding Images:
To add an image into the page you need to use an (img) element. This is an empty element (which means there is no closing tag). It must carry the following two attributes:
- src: This tells the browser where it can find the image file.
- alt: This provides a text description of the image which describes the image if you cannot see it.
Height & Widthof Images:
- height: This specifies the height of the image in pixels.
- width: This specifies the width of the image in pixels.
Where to Place Images in Your Code?
- before a paragraph: The paragraph starts on a new line after the image.
- inside the start of a paragraph: The first row of text aligns with the bottom of the image.
- in the middle of a paragraph: The image is placed between the words of the paragraph that it appears in.
Three Rules for Creating Images:
- Save images in the right format: Websites mainly use images in jpeg, gif, or png format.
- Save images at the right size: You should save the image at the same width and height it will appear on the website.
- Use the correct resolution: Resolution refers to the number of dots per inch, So saving images at a higher resolution results in images that are larger than necessary and take longer to download.
Image Formats:
- JPEG: Whenever you have many different colors in a picture you should use a JPEG.
- GIF/PNG: Use GIF or PNG format when saving images with few colors or large areas of the same color.
Image Resolution:
Images created for the web should be saved at a resolution of 72 ppi. The higher the resolution of the image, the larger the size of the file which will increase the time needed to load them and therefore slow down viewing of your web pages.
Animated GIFs:
Animated GIFs show several frames of an image in sequence and therefore can be used to create simple animations.
Transparency:
Creating an image that is partially transparent (or “see-through”) for the web involves selecting one of two formats:
- Transparent GIF: If the transparent part of the image has straight edges and it is 100% transparent (that is, not semi-opaque), you can save the image as a GIF (with the transparency option selected).
- PNG: If the transparent part of the image has diagonal or rounded edges or if you want a semiopaque transparency or a dropshadow, then you will need to save it as a PNG.
HTML 5: Figure and Figure Caption:
- (figure): Images often come with captions. HTML5 has introduced a new (figure) element to contain images and their caption so that the two are associated. You can have more than one image inside the (figure) element as long as they all share the same caption.
- (figcaption): The (figcaption) element has been added to HTML5 in order to allow web page authors to add a caption to an image.
Html: Color:
Foreground Color: color: The color property allows you to specify the color of text inside an element. You can specify any color in CSS in one of three ways:
- rgb values: These express colors in terms of how much red, green and blue are used to make it up. For example: rgb(100,100,90)
- hex codes: These are six-digit codes that represent the amount of red, green and blue in a color, preceded by a pound or hash # sign. For example: #ee3e80
- color names: There are 147 predefined color names that are recognized by browsers. For example: DarkCyan

Background Color: background-color: CSS treats each HTML element as if it appears in a box, and the background-color property sets the color of the background for that box.
You can specify your choice of background color in the same three ways you can specify foreground colors: RGB values, hex codes, and color names (covered on the next page). If you do not specify a background color, then the background is transparent.
Understanding Color:
Every color on a computer screen is created by mixing amounts of red, green, and blue. To find the color you want, you can use a color picker. Color picking tools are available in image editing programs like Photoshop and GIMP.
Contrast:
When picking foreground and background colors, it is important to ensure that there is enough contrast for the text to be legible.
- Low Contrast: Text is harder to read when there is low contrast between background and foreground colors.
- High Contrast: Text is easier to read when there is higher contrast between background and foreground colors. If you want people to read a lot of text on your page, however, then too much contrast can make it harder to read, too.
- Medium Contrast: For long spans of text, reducing the contrast a little bit improves readability.
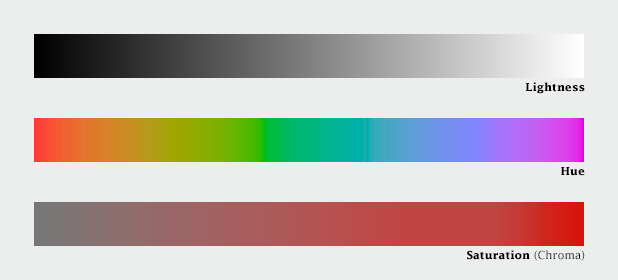
CSS 3: HSL Colors
CSS3 introduces an entirely new and intuitive way to specify colors using hue, saturation, and lightness values.
- Hue: Hue is the colloquial idea of color. In HSL colors, hue is often represented as a color circle where the angle represents the color, although it may also be shown as a slider with values from 0 to 360.
- Saturation: Saturation is the amount of gray in a color. Saturation is represented as a percentage. 100% is full saturation and 0% is a shade of gray.
- Ligh tness: Lightness is the amount of white (lightness) or black (darkness) in a color. Lightness is represented as a percentage. 0% lightness is black, 100% lightness is white, and 50% lightness is normal. Lightness is sometimes referred to as luminosity.
Html: Text
The properties that allow you to control the appearance of text can be split into two groups:
- Those that directly affect the font and its appearance (including the typeface, whether it is regular, bold or italic, and the size of the text).
- Those that would have the same effect on text no matter what font you were using (including the color of text and the spacing between words and letters).
Typeface Terminology:
- Serif: Serif fonts have extra details on the ends of the main strokes of the letters. These details are known as serifs.
- Sans-Serif: Sans-serif fonts have straight ends to letters, and therefore have a much cleaner design.
- Monospace: Every letter in a monospace (or fixed-width) font is the same width. (Non-monospace fonts have different widths.)
- Cursive: Cursive fonts either have joining strokes or other cursive characteristics, such as handwriting styles.
- Fantasy: Fantasy fonts are usually decorative fonts and are often used for titles. They’re not designed for long bodies of text.
Choosing a Typeface for your Website:
When choosing a typeface, it is important to understand that a browser will usually only display it if it’s installed on that user’s computer. As a result, sites often use a small set of typefaces that are installed on most computers (shown above).
Browsers are supposed to support at least one typeface from each of the groups above. For this reason, it is common to add the generic font name after your preferred choice of typefaces. For example, if you wanted serif type, you could write the following: font-family: Georgia, Times, serif;
- Specifying Typefaces: font-family: The font-family property allows you to specify the typeface that should be used for any text inside the element(s) to which a CSS rule applies. The value of this property is the name of the typeface you want to use.
- Size of Type: font-size: The font-size property enables you to specify a size for the font. There are several ways to specify the size of a font. The most common are:
- pixels: Pixels are commonly used because they allow web designers very precise control over how much space their text takes up. The number of pixels is followed by the letters px.
- percentages: The default size of text in browsers is 16px. So a size of 75% would be the equivalent of 12px, and 200% would be 32px.
- ems: An em is equivalent to the width of a letter m.
Type Scales:
You may have noticed that programs such as Word, Photoshop and InDesign offer the same sizes of text. This is because they are set according to a scale or ratio that was developed by European typographers in the sixteenth century. It is considered that this scale for type is pleasing to the eye and it has therefore changed little in the last 400 years.
Setting font size in pixels is the best way to ensure that the type appears at the size you intended (because percentages and ems are more likely to vary if a user has changed the default size of text in their browser).

More Font Choice: @font-face:
@font-face allows you to use a font, even if it is not installed on the computer of the person browsing, by allowing you to specify a path to a copy of the font, which will be downloaded if it is not on the user’s machine. It is important that the license for the font permits it to be used in this way. You add the font to your style sheet using the @font-face rule.
- font-family: This specifies the name of the font. This name can then be used as a value of the font-family property in the rest of the style sheet.
- src: This specifies the path to the font. In order for this technique to work in all browsers, you will probably need to specify paths to a few different versions of the font.
- format: This specifies the format that the font is supplied in.
Google also provides open source fonts. Rather than adding the @font-face rule to your own style sheet, you link to a CSS file and font files on their servers: www.google.com/webfonts.
Styling Links: link, :visited
Browsers tend to show links in blue with an underline by default, and they will change the color of links that have been visited to help users know which pages they have been to.
- :link: This allows you to set styles for links that have not yet been visited.
- :visited: This allows you to set styles for links that have been clicked on.
Responding to Users: hover, :active, :focus
There are three pseudo-classes that allow you to change the appearance of elements when a user is interacting with them.
- :hover: This is applied when a user hovers over an element with a pointing device such as a mouse. This has commonly been used to change the appearance of links and buttons when a user places their cursor over them.
- :active: This is applied when an element is being activated by a user; for example, when a button is being pressed or a link being clicked.
- :focus: This is applied when an element has focus. Any element that you can interact with, such as a link you can click on or any form control can have focus.
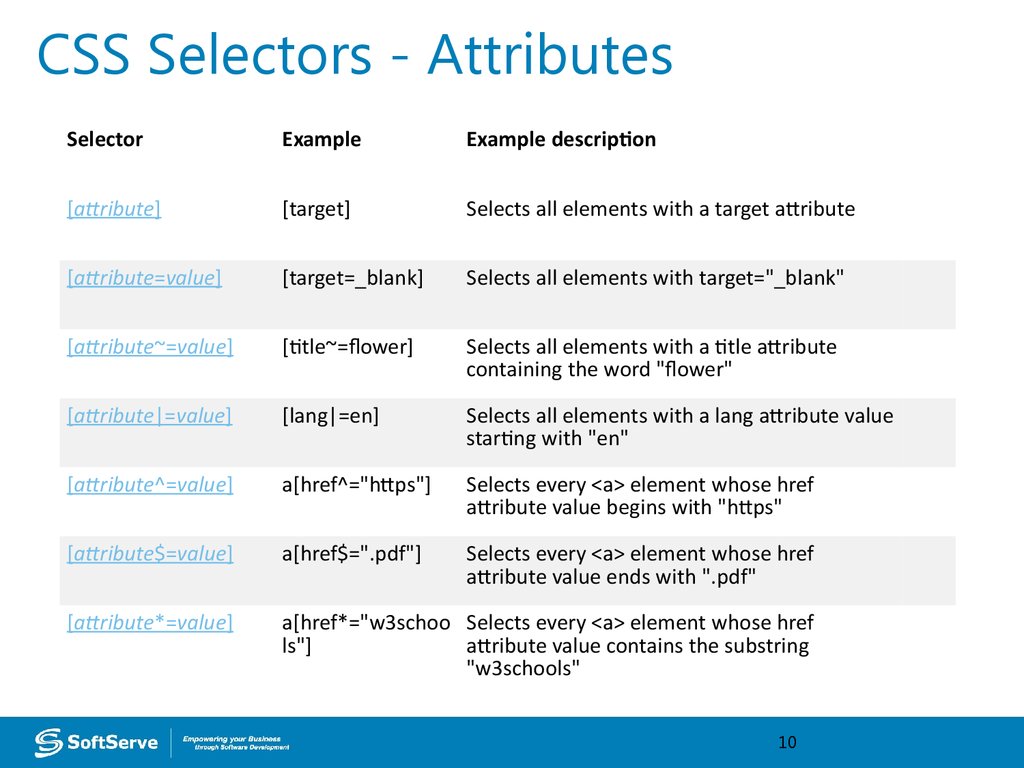
Attribute Selectors:
Javascript: JPEG vs PNG vs GIF
which image format to use and when?
Several statistics reports, including the one from HTTP Archive, indicate that these 3 formats together comprise of more than 95% of all images loaded on websites. However, these 3 image formats have significant differences amongst themselves thus making each of them suitable for specific use cases.
1. TL;DR :
Use JPEG format for all images that contain a natural scene or photograph where variation in colour and intensity is smooth. Use PNG format for any image that needs transparency or for images with text & objects with sharp contrast edges like logos. Use GIF format for images that contain animations.
2. Compression
Almost all forms of data that we see on the internet are compressed to reduce the size of data and ensure faster transmission. Compression can be of two types — lossless and lossy.
- In lossless compression, it is possible to reconstruct the original image from the compressed image because there is no information loss during compression.
- This is not the case in lossy compression i.e. data loss in lossy compression is irreversible. However, this compression ratio comes at a cost of reduced quality that becomes more evident after zooming in on the image. This noticeable reduction in quality or distortion of the image is called compression artefact.
JPEG
JPEG is a lossy compression specification that takes advantage of human perception. Beyond ratios of 1:10, the compression artefacts become more prominent. JPEG images are best suited for photographs and paintings of natural scenes where the variations in colour and intensity are smooth. However, if an image contains text or lines, where a sharp contrast between adjacent pixels is desired to highlight the proper shape, this lossy compression technique does not yield good results.
PNG
PNG is a lossless image format using DEFLATE compression. No data is lost during compression and no compression artefacts are introduced in the image. PNG image would retain higher quality than an image than JPEG and would look a lot sharper, it would also occupy more space on the disk. This makes it unsuitable for storing or transferring high-resolution digital photographs but a great choice for images with text, logos and shapes with sharp edges.
GIF
GIF is also a lossless image format that uses LZW compression algorithm. Given that PNG is now supported across all major devices and that PNG compression is about 5–25% better than GIF compression, GIF images are now mainly used only if the image contains animations.
3.Transparency:
In a simple form, transparency indicates something that is completely invisible. Logos and icons often need to be placed on backgrounds with variable colours.
JPEG
JPEG images don’t support transparency and are hence not usable for such cases.
PNG
PNG images support transparency in two ways — inserting an alpha channel that allows partial transparency or by declaring a single colour as transparent (index transparency). Partial transparency makes the edges blend smoothly into the background.
GIF
GIF images support transparency by declaring a single colour in the colour palette as transparent (index transparency). GIF is unsuitable for images with transparent backgrounds.
4.Colours
There is a significant difference in the number of colours that can be supported by these 3 formats.
JPEG
Images can support around 16 million colours. This is what makes them suitable for storing images of natural scenes.
PNG
Images mainly have two modes — PNG8 and PNG24. PNG8 can support upto 256 colours whereas PNG24 can handle upto 16 million colours like a JPEG image.
GIF
Images are limited to 256 colours. If index transparency is used, then one of these 256 colours is assigned as transparent and the remaining 255 are used for other colours.
5.Animation
Animation, in this case, refers to any change or movement in the image. Essentially a part or the entire image changes with time.
Of these 3 formats, only GIF supports animation. Of late, with the advent of companies Tumblr, 9Gag, Giphy etc. the use of GIF format for memes has picked up.